ROP1 OPC/UA Adapter.html
Outline
OPC Unified Architecture (OPC UA) is an industrial M2M communication protocol for interoperability developed by the OPC Foundation and successor of the COM/DCOM based OPC protocol. The POC/UA Adapter allows eclipse/impulse users to connect to such servers and trace variables and events. Its UI simplifies configuration of multiple connections.The OPC/UA Adapter is based on the eclipse Milo OPC/UA implementation (Kevin Herron).
| Platforms: |
|
|||
| Requirements: |
|
|||
| Known limitations: |
|
|||
| Status: |
|
|||
| Operations: |
|
|||
| Parameters: |
|
Video
OPC/UA
Using impulse as back-end for OPC/UA, you may
- get a quick overview of your servers.
- inspect all node,
- subscribe variable nodes and records its change,
- trace events,
- and read data from multiple servers into one view.
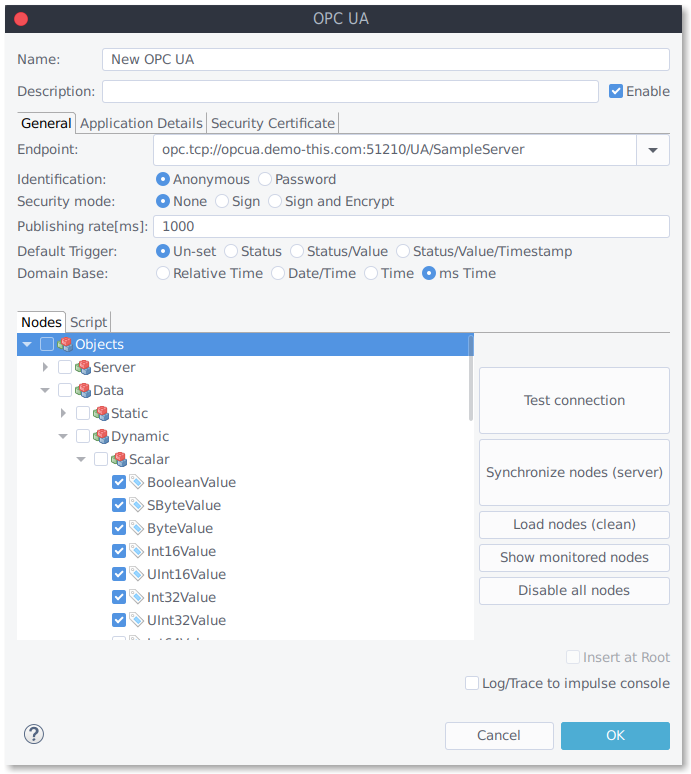
End-point Configuration
- Enable: Enables/disables the port adapter.
- End-point: Select the OPC/UA server as the input.
Enter (or select) the endpoint url, configure the identification and security settings and press "Test Connection" to check if your settings are valid and the server reachable.
Security Mode and Policy
- Security Mode: None, Sign, Sign and Encrypt.
- Security Policy: Basic128Rsa15, Basic256, Basic256Sha256, None.
- Security Certificate: Enter certificate file, a password, and select the alias.
Three different security modes are available:
- None
- Sign
- Sign & Encrypt
If the selected security mode is "None", requests are not secured at all. If "Sign" is selected, messages are signed with the private key of the Certificate instance of the client application. If the selected security mode is Sign & Encrypt, messages are also encrypted with the public key of the certificate of the server's application instance.
The security policy determines the algorithm for signing and encryption. Several security policies are available:
- Basic128Rsa15
- Basic256
- Basic256Sha256
- None
If "None" is selected, a number of algorithms are used that do not contain security settings. If "Basic128RSA15" is selected, a set of algorithms that RSA15 uses as a key-wrap algorithm, and 128-bit encryption algorithms are used. When Basic256 is selected, a number of algorithms are used that use the following 256-bit encryption algorithms are used.
Identification Modes
- Identification: Anonymous, Password.
- User: Enter the user name.
- Password: Enter the user password.
The user authentication process is performed during session setup with the server. There are
three options are available:
- Anonymous
- Username and Password
- Certificate and Private Key (tbi)
If "Anonymous" is selected, no user information is provided. If "User Name and Password" is selected is selected, a user is identified by a user name and password. The user is prompted to enter the user name and password in separate text fields in the GUI. When "Certificate and Private Key" is selected, the User is identified by an X509v3 certificate file and its private key.
Application Details
- Application details: Enter application name/ URI and Product URI.
- Timeout: Enter session/request timeout.
On the Application Details tab you may configure additional settings like timeout and application name/ URI.
Node Configuration
- Default Trigger: Enter the default trigger mode.
- Domain Base:Relative time, Date/Time, ms Time.
- Nodes: View and enable subscription.
Click "Load/Synchronize nodes from server" to synchronize node information of your connection. Enable the check boxes in front of the nodes to monitor the selected nodes.
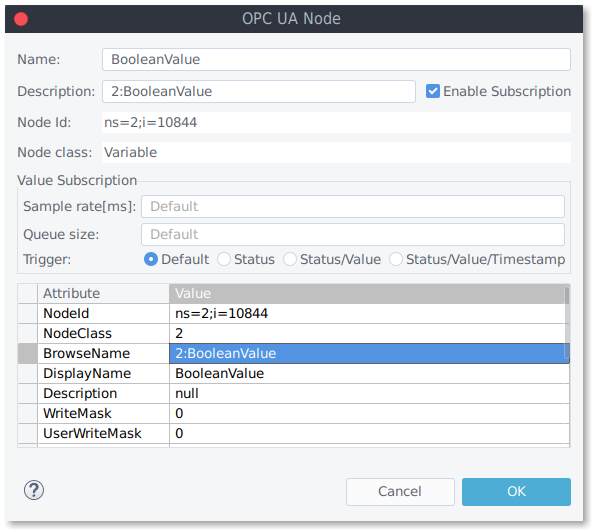
Double-click the node(s) for additional configuration (rate, queues or event attributes) . With these few steps, you should be able to trace your first node data.
Script
With scripting you may use the milo SDK to access, read and modify OPC node.
The script is executed after connecting (background thread).
	// client: opc adapter of type OpcUaClient
	// console: console output of type MessageConsoleStream
	// progress: progress control of type IPortProgress
	//
	var count = 0;
	while (!progress.isCanceled()) {

	    if (progress.isStreaming()) {

	        // define a node
	        var nodeId = NodeId.parse("ns=2;i=10223");

	        // read the node
	        var value = client.readValue(0, TimestampsToReturn.Both, nodeId).get();
	        console.println(value);

	        // write the node
	        client.writeValue(nodeId, DataValue.valueOnly(new Variant(true))).get();

	        // stop streaming after 10 cycles
	        count++;
	        if (count > 10)
	        	progress.cancel();
	    }
	    // wait some time
	    Thread.sleep(500);
}
 32/64bit
 32/64bit
 32/64bit


